Crafting a Homemade Container with Go: A Step-by-Step Guide
Welcome to this step-by-step tutorial where we'll make our very own container using Go! This fun project helps us peel back the layers of popular container technologies like Docker to understand what's really happening underneath. We'll end up with a simple container that runs a command in its own little world, complete with its own user, hostname, and process ID.
Before we dive in, make sure you have Go installed on your computer. If you don't, head over to the official Go website and follow their instructions to get it set up.
Step 1: Creating a Basic Go Program
Alright, let's get our hands dirty and start coding! Our first step is to make a new process that stands alone, separate from other processes on the system. This is the core idea behind containers - they're just processes with some extra boundaries. We'll use something called Linux namespaces to set up these boundaries.
Here's the beginning of our Go program:
package main

import (
	"fmt"
	"os"
	"os/exec"
	"syscall"
)

func main() {
	switch os.Args[1] {
	case "run":
		run()
	case "child":
		child()
	default:
		panic("what??")
	}
}

func run() {
	fmt.Printf("Running %v as PID %d\n", os.Args[2:], os.Getpid())

	cmd := exec.Command("/proc/self/exe", append([]string{"child"}, os.Args[2:]...)...)
	cmd.Stdin = os.Stdin
	cmd.Stdout = os.Stdout
	cmd.Stderr = os.Stderr
	cmd.SysProcAttr = &syscall.SysProcAttr{
		Cloneflags: syscall.CLONE_NEWUTS | syscall.CLONE_NEWPID,
	}

	if err := cmd.Run(); err != nil {
		fmt.Println("Error running the /proc/self/exe command:", err)
		os.Exit(1)
	}
}

func child() {
	fmt.Printf("Running %v as PID %d\n", os.Args[2:], os.Getpid())

	// Set hostname of the new UTS namespace
	if err := syscall.Sethostname([]byte("HMcontainer")); err != nil {
		fmt.Println("Error setting hostname:", err)
		os.Exit(1)
	}

	cmd := exec.Command(os.Args[2], os.Args[3:]...)
	cmd.Stdin = os.Stdin
	cmd.Stdout = os.Stdout
	cmd.Stderr = os.Stderr

	if err := cmd.Run(); err != nil {
		fmt.Println("Error running the child command:", err)
		os.Exit(1)
	}
}
In this script, the run() function creates a new command that calls this program itself with the "child" argument plus the original arguments. It then sets some flags on the command to create new namespaces and runs the command.
Save this script as main.go and let's give it a spin:
go build -o container main.go
./container run /bin/sh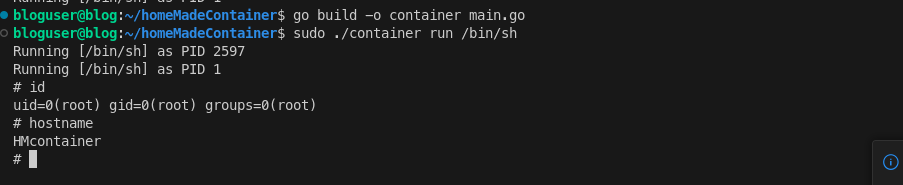
After running these commands, you'll see something like "Running [/bin/sh] as PID X". That's our new process! It's running /bin/sh all by itself in a new UTS, PID, and mount namespace.
At this point, if you try to run ls, you'll find that you're still in the project directory.

But don't worry! As we progress, we'll add more functionalities to make our homemade container more isolated and more container-like. So let's keep going!
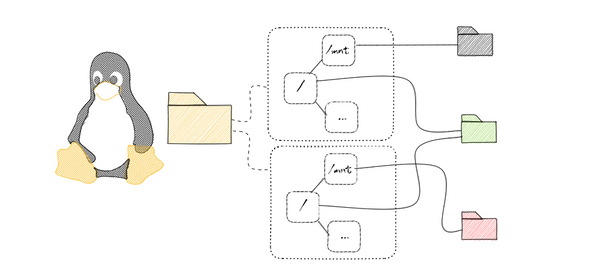
Step 2: Pivoting to a New Root Filesystem
The next step to make our container more container-like is to give it its own filesystem. This filesystem will serve as its root, isolating it from the host filesystem.
To achieve this, we'll need a simple Linux filesystem. You can download one from Alpine Linux (a lightweight Linux distribution) using the following commands:
wget https://dl-cdn.alpinelinux.org/alpine/v3.18/releases/x86_64/alpine-minirootfs-3.18.0-x86_64.tar.gz
mkdir rootfs
tar -xzf alpine-minirootfs-3.18.0-x86_64.tar.gz -C rootfs
This downloads the Alpine Linux minimal root filesystem and extracts it into a new rootfs directory.
Now, we need to modify our Go script to use this new filesystem. We'll add a few lines to our child() function, using the syscall.Chroot() function to change the root directory and os.Chdir() to change the working directory.
func child() {
	// Rest of the code goes here
	if err := syscall.Chroot("/path/to/your/rootfs"); err != nil {
		fmt.Println("Error changing root:", err)
		os.Exit(1)
	}

	// Change working directory after changing the root.
	if err := os.Chdir("/"); err != nil {
		fmt.Println("Error changing working directory:", err)
		os.Exit(1)
	}

	// Rest of the code goes here
}
After building and running the program again, if you execute ls, you'll see the files of the new filesystem, not your original filesystem. You're now running inside the new filesystem!

In the new root filesystem of our container, if you try running ps -a to view the currently running processes, you'll find that it doesn't work. This is because ps relies on a special 'virtual' filesystem called /proc to gather its information.
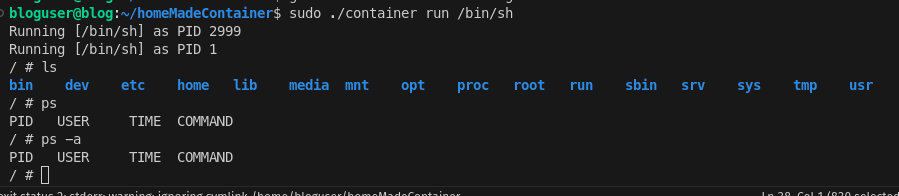
The /proc filesystem is a system-created space that stores and organizes information about the system's state and the processes running on it. It's different from a typical filesystem with regular files. When we use ps, it looks into /proc to fetch the data it needs to function.
However, when we created our new isolated container environment and set up a new root filesystem, we didn't include a /proc filesystem. That's why ps -a can't find the necessary information and fails to work.
To make ps and other similar tools work correctly inside our container, we need to 'mount' or set up a /proc filesystem inside the new root filesystem of our container. Let's dive into how we can do this in the next step.
Step 3: Mounting /proc in the New Root File System
func run() {
	// Rest of the code goes here
	cmd.SysProcAttr = &syscall.SysProcAttr{
		Cloneflags: syscall.CLONE_NEWUTS | syscall.CLONE_NEWPID | syscall.CLONE_NEWNS,
	}

	// Rest of the code goes here
}

func child() {

	// Rest of the code goes here
    // Mount proc. This needs to be done after chroot and chdir.
	if err := syscall.Mount("proc", "proc", "proc", 0, ""); err != nil 	   {
		fmt.Println("Error mounting proc:", err)
		os.Exit(1)
	}

	// Rest of the code goes here
}
This new piece of code mounts the /proc filesystem in the new root file system. This system call tells the kernel to attach the filesystem found at source (which is "proc") to the location (also "proc"). As the filesystem type is also "proc", this tells the kernel to treat this as a special proc filesystem. If there's any error during this process, we handle it by printing out an error message and then exiting the program.
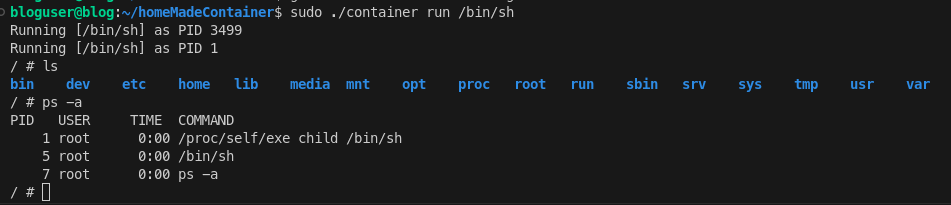
After adding this code, try running the program again and executing ps -a in the container's shell. It should now work perfectly, displaying the list of processes running in the container, as shown in the screenshot below. This shows that we've successfully mounted the /proc filesystem inside our container, and we're now one step closer to a fully functional, albeit minimal, container!
Congratulations on reaching this far! Next, we'll enhance our program to run processes as a non-root user.
Step 4: Running as a Different User
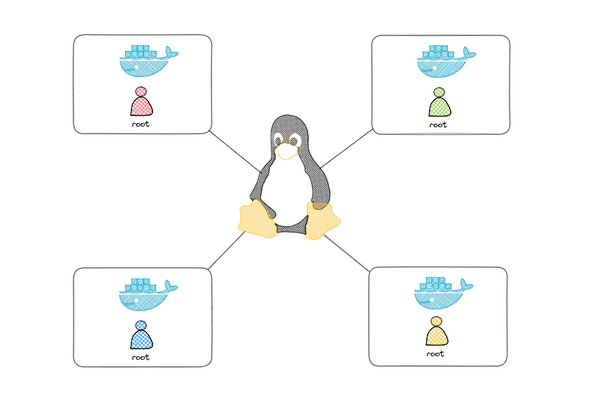
In our current setup, the processes inside the container run as root. While this might be fine for our simple container, it's generally not a good practice for real-world usage due to security concerns. To make our container more secure, we'll add functionality to run the processes inside it as a non-root user.
We'll do this by adding some code to our Go program that sets the user ID (UID) and group ID (GID) for the processes. We'll use a user named "guest" for this example, but you can use any existing user.
package main

import (
	"fmt"
	"os"
	"os/exec"
	"os/user"
	"strconv"
	"syscall"
)


func child() {
	 // Rest of the code goes here

	userName := "guest"
	u, err := user.Lookup(userName)
	if err != nil {
		fmt.Println("Error looking up user:", err)
		os.Exit(1)
	}

	// Parse the found UID and GID.
	uid, err := strconv.Atoi(u.Uid)
	if err != nil {
		fmt.Println("Error parsing UID:", err)
		os.Exit(1)
	}
	gid, err := strconv.Atoi(u.Gid)
	if err != nil {
		fmt.Println("Error parsing GID:", err)
		os.Exit(1)
	}

	cmd := exec.Command(os.Args[2], os.Args[3:]...)
	cmd.Stdin = os.Stdin
	cmd.Stdout = os.Stdout
	cmd.Stderr = os.Stderr

	// Set the UID and GID for the command.
	cmd.SysProcAttr = &syscall.SysProcAttr{
		Credential: &syscall.Credential{
			Uid:         uint32(uid),
			Gid:         uint32(gid),
			NoSetGroups: true,
		},
	}

	if err := cmd.Run(); err != nil {
		fmt.Println("Error running the child command:", err)
		os.Exit(1)
	}
}
This code fetches the UID and GID for the "guest" user, converts them to integers, and then sets the UID and GID of the process we're running inside our container.
After updating your code, run the program again. If you execute the id command inside the container's shell, it should now show that you're running as the "guest" user. Moreover, if you check the /etc/passwd file, you'll see that the "guest" user exists there. The screenshot below demonstrates these outputs.

By achieving this, we've added an important feature to our homemade container. It can now run processes as a specific, non-root user, enhancing its security.
Conclusion
Congratulations! You've successfully created a homemade container with Go. We've covered a lot of ground in this tutorial, including creating a basic container, downloading and setting up a new filesystem, mounting /proc, and running processes under a different user.
We've leveraged the power of Linux namespaces to isolate processes and created an environment that's remarkably similar to what Docker does under the hood. Of course, Docker has a lot more features and robustness, but this is a good start for understanding the principles of containers.
The complete code can be found at this GitHub repository. Feel free to clone it, play around with it, and modify it as per your needs. Remember, the best way to learn is by doing.
We hope this post has piqued your curiosity about the internals of containers. There's still a lot more to explore - this is just the tip of the iceberg.
In case you want to dive deeper into the subject, I highly recommend watching Liz Rice's talk at DockerCon 2017, where she explains the concept of containers from scratch.