Exploring Reverse Proxies: A Practical Guide using Traefik and Let's Encrypt
if you've ever wondered "What is a Reverse Proxy?", we've got you covered. And if you're keen on understanding the difference between reverse and forward proxies, you'll find a whole section dedicated just to that.
Later in this post, we're going hands-on. We'll set up Traefik, a popular reverse proxy server, and secure a simple application using Let's Encrypt. If you're new to Let's Encrypt, no worries - we're explaining how it works in plain language, and you'll see it in action when we put our setup to the test.
What is a Reverse Proxy?
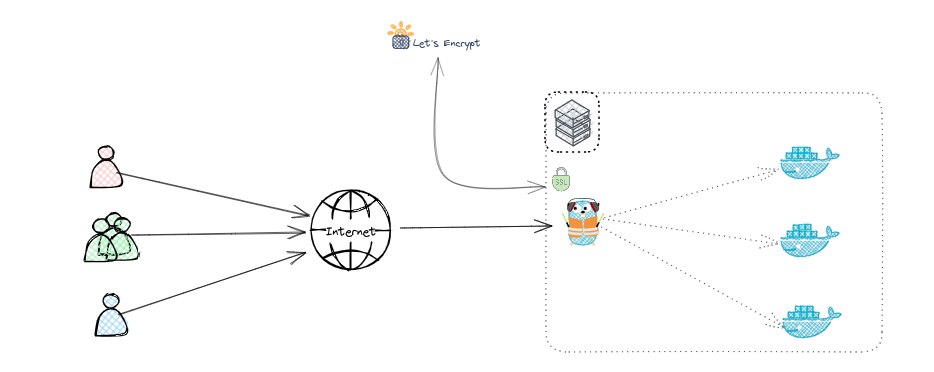
A reverse proxy is a server that stands between client devices and a web server, forwarding client requests to the appropriate backend server. Once processed, the reverse proxy returns the server's response to the client.
Forward Proxy vs Reverse Proxy
Having learned about reverse proxies, you might be curious about forward proxies and how they differ. The two types of proxies have some similarities - they both act as intermediaries and provide various benefits related to networking and server management - but their roles and applications are distinct.
Forward Proxy
A forward proxy serves client devices directly. When a client makes a request to access a specific resource, the forward proxy takes this request and forwards it to the internet. The forward proxy then retrieves the resource from the server and sends it back to the client. In this scenario, the forward proxy acts as a gateway from a network to the internet.
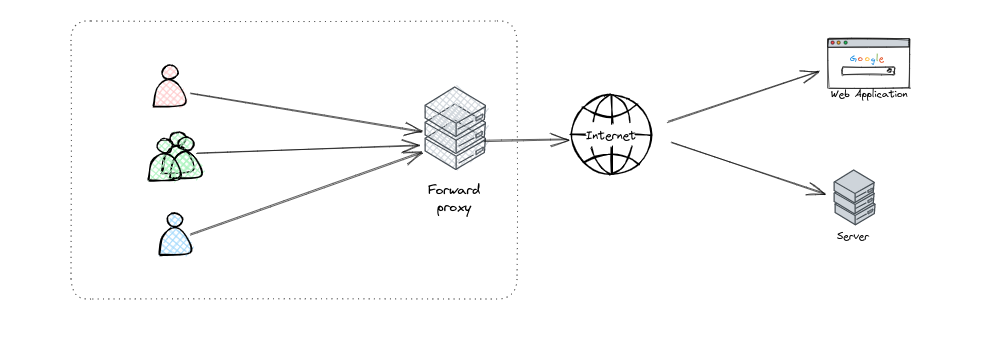
Benefits of forward proxies include:
- Anonymity: Since the forward proxy communicates with web servers on behalf of the client, it can hide the client's identity, thus ensuring privacy.
- Access Control: Forward proxies can enforce access controls to internet resources, helping organizations manage what content can be accessed.
- Caching: Forward proxies can cache popular content to reduce bandwidth usage and speed up loading times.
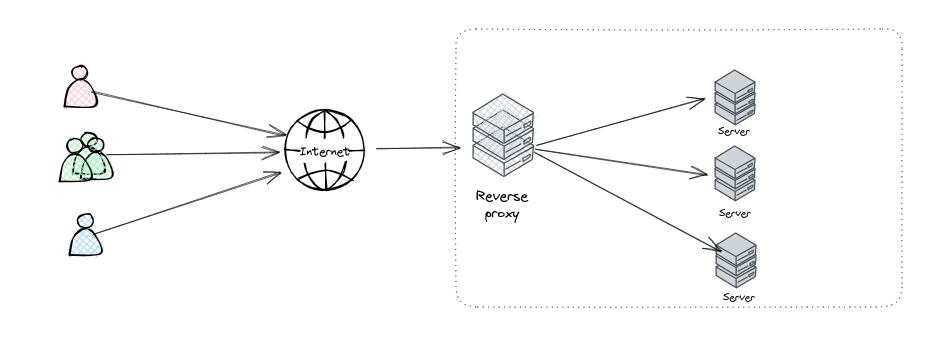
Reverse Proxy
As we've already learned, a reverse proxy sits in front of web servers, accepting client requests and passing them to the appropriate server. Once the server processes the request, the reverse proxy sends the response back to the client. Reverse proxies act as gateways from the internet to a network.
Why Use a Reverse Proxy?
Reverse proxies offer numerous benefits:
- Load Balancing: Distributing client requests across multiple servers prevents any single server from becoming a bottleneck.
- Increased Security: Reverse proxies provide an additional defense layer against malicious activities by obfuscating the details of backend servers.
- SSL Termination: Reverse proxies offload the task of encrypting and decrypting SSL and TLS requests from backend servers, thereby improving performance.
- Caching: Reverse proxies can cache a copy of the server's response and deliver it to the client if the same request is made again.
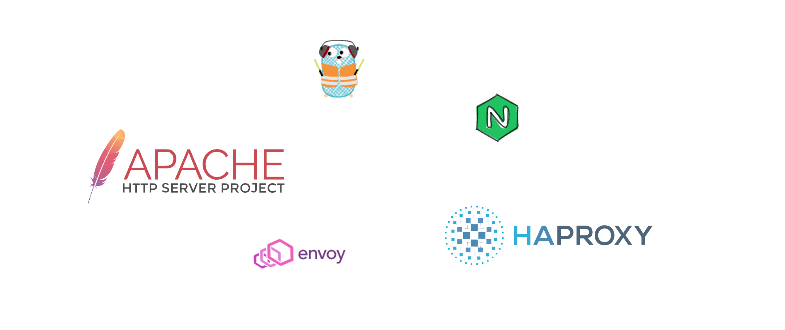
Popular Reverse Proxy Servers
- Nginx
- Apache HTTP Server with mod_proxy
- Traefik
- HAProxy
- Envoy Proxy
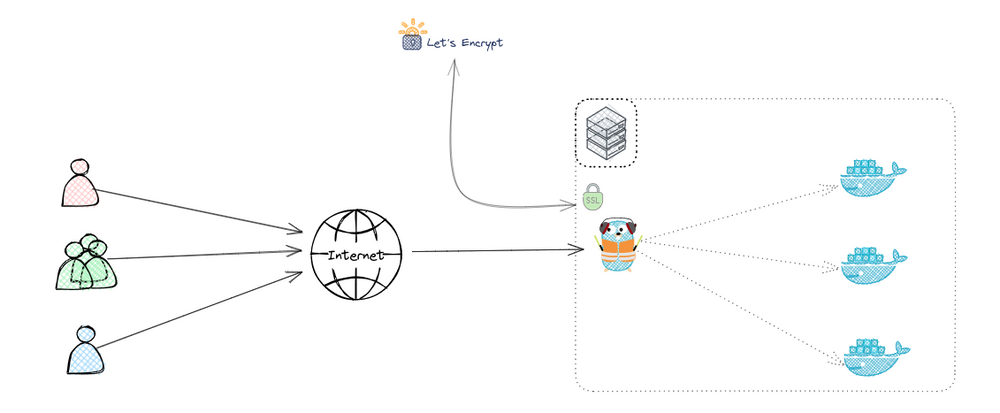
How Does Let's Encrypt Work?
Let's Encrypt is a free, automated, and open Certificate Authority that provides SSL/TLS certificates to enable encrypted connections to websites. Its mission is to create a more secure and privacy-respecting web by promoting the widespread adoption of HTTPS.
Let's Encrypt follows a protocol called ACME (Automated Certificate Management Environment) for the issuance and renewal of certificates. Here's a simplified version of how it works:
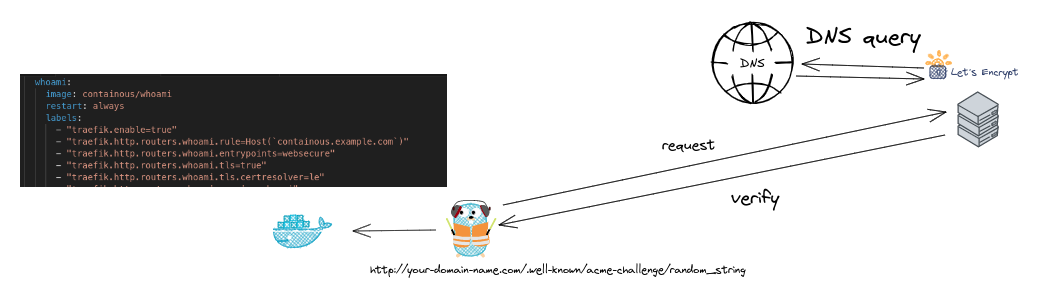
Step 1: Domain Ownership Verification
To ensure that the certificate isn't provided to malicious entities, Let's Encrypt needs to confirm that the entity controlling the domain is the one requesting the certificate. This is achieved through a challenge-response protocol.
In our example with Traefik, we're using the HTTP challenge method, where Traefik will be asked to put a specific file at a known location on your site, like http://your-domain.com/.well-known/acme-challenge/random_string. Let's Encrypt then verifies the file's presence, thus confirming domain ownership.
Step 2: Certificate Issuance and Installation
Once domain ownership is confirmed, Let's Encrypt issues a certificate that can be installed on your server. Traefik automates this step by pulling the issued certificate and storing it locally, then using it whenever an HTTPS connection is initiated.
Step 3: Automatic Renewal
Let's Encrypt certificates are valid for 90 days, but you don't have to worry about the expiration date because Traefik will automatically renew the certificates before they expire, as long as the ACME configuration is correct.
By automating the process of issuing, installing, and renewing certificates, Let's Encrypt has significantly lowered the complexity of setting up and maintaining HTTPS on a website.
Practical Guide: Using Traefik with Let's Encrypt
We will set up Traefik to act as a reverse proxy for a simple "Whoami" application, and secure the app using Let's Encrypt.
Step 0: Configuring DNS Records
Before proceeding, make sure your domain name is correctly configured. Create a DNS A Record that points your domain to the public IP address of your server.
Step 1: Installing and Configuring Traefik
Create a docker-compose.yaml file, add configurations for Traefik:
version: '3.5'
services:

  traefik:
    image: "traefik:v2.8"
    container_name: traefik
    hostname: traefik
    command:
      - --entrypoints.web.address=:80
      - --entrypoints.websecure.address=:443
      - --providers.docker
      - --providers.docker.exposedByDefault=false
      - --api
      - [email protected]
      - --certificatesresolvers.le.acme.storage=/letsencrypt/acme.json
      - --certificatesresolvers.le.acme.tlschallenge=true
      - --log.level=ERROR
      - --accesslog=true
    ports:
      - 80:80
      - 443:443
    volumes:
      - "/var/run/docker.sock:/var/run/docker.sock:ro"
      - "./letsencrypt:/letsencrypt"
    labels:
      - "traefik.enable=true"
      # traefik Dashboard
      - "traefik.http.routers.traefik.rule=Host(`traefik.example.com`)"
      - "traefik.http.routers.traefik.service=api@internal"
      - "traefik.http.routers.traefik.tls=true"
      - "traefik.http.routers.traefik.tls.certresolver=le"
      - "traefik.http.routers.traefik.entrypoints=websecure"
      - "traefik.http.routers.traefik.middlewares=authtraefik"
      - "traefik.http.middlewares.authtraefik.basicauth.users=your-user:$$your-password" # generate Basic auth pass
    restart: unless-stopped
Replace [email protected] with your actual email address and traefik.example.com with your traefik dashboard domain name.
To create a user:password pair for the Traefik dashboard, you can use the following command:
echo $(htpasswd -nB your-user) | sed -e s/\\$/\\$\\$/gThen replace your-user:$$your-password with the generated values in your docker-compose.yaml file.
Step 2: Integrating Let's Encrypt
Add configurations to the docker-compose.yaml file for the Whoami app, as shown below:
  whoami:
    image: containous/whoami
    restart: always
    labels:
      - "traefik.enable=true"
      - "traefik.http.routers.whoami.rule=Host(`containous.example.com`)"
      - "traefik.http.routers.whoami.entrypoints=websecure"
      - "traefik.http.routers.whoami.tls=true"
      - "traefik.http.routers.whoami.tls.certresolver=le"
      - "traefik.http.routers.whoami.service=whoami"
      - "traefik.http.routers.whoami.priority=100"
      - "traefik.http.services.whoami.loadbalancer.server.port=80"
Remember to replace containous.example.com with your actual domain name.
Step 3: Starting the Services
Start the services with the command:
docker-compose up -dYou should now be able to access your Whoami application over HTTPS, secured by a Let's Encrypt certificate.
Conclusion
Reverse proxies are integral to web infrastructure, enhancing security, load balancing, and performance. This tutorial walked through setting up a reverse proxy using Traefik and securing it using Let's Encrypt, demonstrating the practical application of reverse proxies in modern web architecture.
