Diving into Linux Namespaces: An Overview of Network Namespaces (Part-2)
In the first part of this series, we introduced the concept of Linux namespaces and explored the basics of PID namespaces. In this part, we will dive into the world of network namespaces and learn how to create and use these powerful tools.
What are network namespaces?
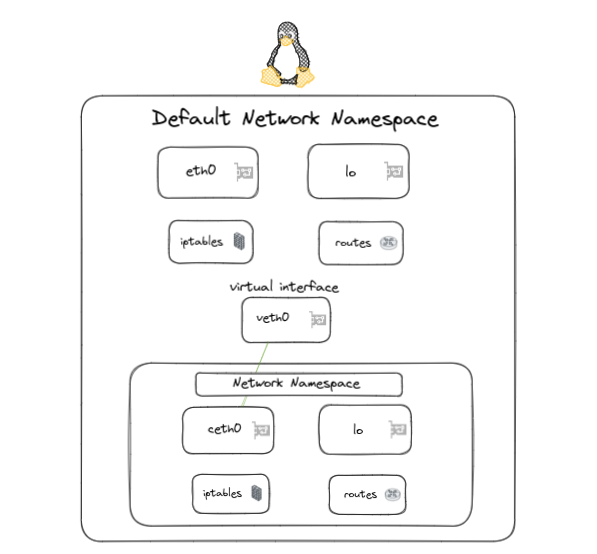
Network namespaces are a feature of the Linux kernel that allow you to create isolated networking environments within a single system. Each network namespace has its own network stack and set of networking resources, such as virtual network interfaces, routing tables, firewall rules, and more. This enables you to create multiple, independent networking contexts on a single system, each with its own set of networking configurations.
Network namespaces are often used in conjunction with other types of namespaces, such as PID namespaces, to create isolated environments for running processes. This is a key aspect of containerization and virtualization, as it enables you to create lightweight, portable, and secure environments for running applications.
Creating and using network namespaces

Using network namespaces, you can create multiple independent network stacks on a single system, each with its own set of virtual network interfaces, routing tables, firewall rules, in this section we will explore how to create and use network namespaces in Linux, and how to manipulate the networking resources of a network namespace.
To get started, let's first inspect the networking resources of our host system. We can use the ip command with the addr, link, and route options to view the IP addresses, network interfaces, and routing table of the host system.
ip addr # ip addresses
ip link # network interfaces
ip route # routing table
Let's use the iptables command to view the firewall rules of the host system.
iptables --list-rules # firewall rules
Now, let's create a network namespace and inspect its networking resources. We can use the ip netns command with the add option to create a network namespace.
ip netns add mynetnsLet's list the network namespaces on our host system with the list option, This will displays all of the network namespaces in /var/run/netns .
ip netns list
We can use the ip netns command with the exec options to create and enter the mynetns network namespace.
ip netns exec mynetns bashThis will create a new network namespace named mynetns, and start a new bash shell in the namespace. From within the namespace, we can use the ip and iptables commands to view and manipulate the networking resources of the namespace.
ip addr
ip link
ip route
iptables --list-rules
Now let's explore how to create and connect a network namespace to a virtuals interfaces in Linux.
virtual network interface can be used to connect network namespaces to each other, or to the host system. They behave like regular Ethernet interfaces, but they do not have a physical link layer device associated with them. Instead, they rely on the Linux kernel to transmit and receive packets between them
  +---------------+    +---------------+
  | mynetns       |    |   Host        |
  | Net namespace |    |   System      |
  |  ceth0        |----|   veth0       |
  +---------------+    +---------------+
First let's creates a pair of virtual Ethernet interfaces, veth0 and ceth0, in the Linux kernel and let's connect them to each other to transmit and receive packets between them.
ip link add veth0 type veth peer name ceth0Let's check if virtual Ethernet interfaces veth0 and ceth0 were successfully created
ip addr | grep -e veth0 -e ceth0
Now let's assign an IP address to veth0 interface and bring it up
ip addr add 192.168.8.1/24 dev veth0
ip link set veth0 up
Let's move a network interface to our network namespace, Using ip link set command with the netns and assign it an IP address and bring it up
# Assign the interface the the Net Namespace
ip link set ceth0 netns mynetns
# Enter the namespace
ip netns exec mynetns bash
# Set an ip address
ip addr add 192.168.8.2/24 dev ceth0
# Bring the interface up
ip link set ceth0 up
# Verify the setup
ip addr
Now let's test the connectivity between the two interfaces using ping and tcpdump
#inside the namespace
ping 192.168.8.1
# outside the namespace
tcpdump -i veth0
That's it! You have now created and connected a network namespace to a virtual interface in Linux. You can use this technique to connect multiple network namespaces to each other, and customize the networking of each namespace to suit your needs.
Here is a good resource to dive deeper into the network namespace : https://iximiuz.com/en/posts/container-networking-is-simple/
Conclusion
In this blog post, we learned about Linux network namespaces and how to create and use them to create isolated networking environments. Network namespaces are a powerful tool for containerization, virtualization.


